In case you haven't checked it out yet, I've put up a new design in the shawl pins. I like it a lot. I almost wish there was one that I had "messed up" on, so that I could keep it. Actually, the two new designs are looking like that, right now. Too many tool marks ...
(5 minutes later) Err, I just took a break to play with one of the designs. Apparently, what I needed was a break from it in order to get the symmetry right. Oops. Expect to see that up in the shop in the next day or two.
I have to say, though, that using Tiffany for design inspiration is a dangerous prospect. He had a whole shop full of people to do the grunt work for him, and even polish and produce designs. It's just me and my ten fingers here, bending wire inspired by his shapes. I have to say though, I do love his work.
Tuesday, April 28, 2009
Monday, April 27, 2009
Oh the cuteness!
For those that like busting stash and can crochet, I found the cutest thing!
Free Amigurumi Patterns
Check out the cuteness! If I felted these things, they'd be great cat toys. Otherwise, if left in intact yarn form, Delilah Damnit would just eat it. (You think I'm joking, but no. One of my cats is part goat and eats plastic.) However, she doesn't eat felted/fulled/what-do-you-call-purposefully-shrunk-crochet? items. Don't ask me about the logic behind that one. She is a force of nature until herself.
As for those that know me, I have issues with leftover yarn. As in, I always have it. It kind of drives me a little crazy. Okay, it drives me alot crazy because I do these projects that are supposed to eat up yarn... and they don't. Seriously, a swallowtail (without the knupps) and an asphyxiation out of one ball of knitpicks shadow? How? I don't know. The boyfriend said he'd put a knit kitty on the back of his motorcycle if I could find it a leather jacket. It's oh so tempting, especially since finding hand-made stuff for a guy is tough to do.
Saturday, April 25, 2009
Sock it to me
Actually, before I get to the knitting news, I just want to put out this apology to anyone who's tried out the xsmall size of the swirl skirt pattern. There's a typo in rows 6, 8, and 10 of the pattern. It should read as follows:
Row 6: *[YO,K1] 3 times, k2tog, K7* repeat 7 times more. There is a total of 8 repeats of this pattern per round.
Row 7: *K12, K2tog* repeat 8 times.
Row 8: *[YO,K1,] 3 times, k2tog, K8* repeat 8 times.
Row 9: *K13, K2tog* repeat 8 times
Row 10: *[YO, K1] 3 times, k2tog, K9* repeat 8 times.
Row 11: *K14, K2tog* repeat 8 times.
The extra small version is the one that has a 96 st cast on. If you've started that version, and couldn't figure out why it was off, this is why. I'm sorry. Hopefully, this will catch all the mistakes and such.
In other knitting news, I've caught a little knitting ADD. I finally finished panel 2 of the front the graduation dress. I've put the front and back halves together as I made them, so to speak. I made the waistband and picked up stitches for the bodice and panel 2. That way, I had less seaming to do once I was done with knitting a part of the dress. After the ocean waves cardigan fiasco, I'm going to block these halves of the dress and put it together to check the fit. If it doesn't, then I'll have time to reknit one part or another as needed. Hopefully, I should get that done this weekend.
Since I finished knitting that panel thursday night, I had a terrible realization. I didn't have that many on-going projects. There's the design I'm creating, but that's most decidedly not mindless knitting. I bound off the cuff of the boyfriend's practice sock part 2, and followed that with the toe of the second sock. I had a sudden realization, however, that I've never made socks for myself. So, I cast on the "Falling in Love" socks by Anni Designs, that was on the MagKnits website. That website, sadly, isn't functional anymore. It's a neat little design with a heart lace panel bordered by cables. I've done cables before, but I'm not very good at it.
I just heard the derisive laugh from my friends on ravelry.
Fine, I can do cables decently well, but they're not easy for me at all. We shall not speak of how many times I dropped the cabled stitches, and leave it at that.
So, I've got enough sock to cover the toe of my foot, and wow! I finally understand what the fuss is all about with the hand made socks. I'm making it out of that new yarn by Deborah Norville. It's 50% superwash wool, 25% rayon from bamboo, and 25% nylon. I love it, and the price is amazingly reasonable. It's a new yarn that's being carried by the larger Joann's craft stores.
Last, but certainly not least, is the wings of a dream shawl. I've gotten a couple of more rows done. I'm really curious to see how it will turn out, since I modified the pattern quite a bit.
Last, but not least, I've got a couple of shawl pins done. I should get a couple of shop updates in tomorrow. Happy knitting!
Wednesday, April 22, 2009
RIP: Eulogy for Ocean Waves Cardigan
It's official.
I'm putting this project to rest, mostly because I'm just that mad at it. I frogged the offending panel, but that wasn't enough to abate my fury. I still want to knit only top-down raglan cardigans. I'm crazy enough to take an oath only to knit raglan constructed cardigans. I'm open minded enough to consider bottom up, knit-in-one piece cardigan. They're teaching a class on it at TNNA's summer show. I'm planning on taking it, and I have EZ's book on knitting in the round.
I'm just not pleased with what happens when I knit pieces that require seaming. You'd think I wouldn't mind seaming, because I learned to sew before I learned how to knit, but no. At least with sewing, I can just re-cut a piece if it doesn't fit well. The idea of cutting my knit fabric just makes me sick! Reshaping a knit piece takes 15 hours not 15 minutes, like it does with sewing. Bleh!
So, I'm officially putting the ocean waves cardigan to rest. Rest assured however, the argosy yarn is going into another project that's staying under wraps for now. For those of you that know me, I've got some designing ambitions, and there's some deadlines that I want to meet. That's right, it made me so mad that I said screw it, and I'm coming up with my own design. I've been taking meticulous line-by-line notes, and it's going pretty well. Here's hoping it works!
And no, I'm not just working on 2 projects. The wings of a dream shawl has a whopping.. uh, 3 rows on it? Heheheh. I don't really count projects as started until they hit several inches long. 3 rows just looks like ... well... not much at all. On the upside, I'm only one lace repeat away from finishing the front panel on the graduation dress! Speaking of that, I should be working on graduating! Aka studying. Rest in peace, ocean waves cardi.
Monday, April 20, 2009
Shop Talk ed. 3 - Shawl Pin Tutorial
Hooray! The shawl pins are up and running! I'm totally in love with some of them, and must remember that they are supposed to find good homes that aren't mine. But, before they do, I realize that they aren't the most intuitive design ever. To help with that, I've created a tutorial on how to use a shawl pin that doesn't have a stick pin.
Each pin works on the same principle:
1) Poke the free end into the fabric.
2) Rotate the pin
3) Poke the free end back out of the fabric
4) Rotate until you have the pin situated the way you want.
It'll take a little bit of practice before you learn how to place the pin just right, but it's worth the effort to have a pin where you don't need to worry about losing different parts.
First off, I have the Swan pin, which has flown to a happy home with Joyarna.
Start with the pin at roughly a 90 degree angle from where you want it to be. So, if you want it to look like this:

Then you should poke the wing tip into the fabric like this:

Once it's in, rotate the pin another 90 degrees, and push as much fabric as you want to hold it into place on the pin. Then poke the wing tip back out of the fabric.

Then it's alot of rotating at this point to get the shawl pin where you want it to be. Here's a step by step progression of 90 degree rotations clockwise to get it where you want it to be. See?


And finally, the swan is where it should be, swimming happily in lace. The swan and the delicately swirling shawl pin have the most amount of twisting around and rotating to get it into place. All the other designs have an easier progression to get the pin in place.
For example, the treble clef works in the same way the leaf would. To get the treble clef into the lace like this:

Start by inserting the curved in at the top of where you'd want the pin to be.

Then rotate the shawl pin and push through as much fabric as much as you want onto the pin.

This next step you can do one of two ways. I took a picture in natural light so you can see the curved end of the shawl pin poking through the fabric better. By tilting the shawl pin a little bit, you poke the curved end right below the top for good alignment.

The other way you could do this last step is simply to push the whole curved bit through, to get to the final step.
And there you have it. I like the treble clef and leaf better than the others, because the curved wire over the pin part of the shawl pin holds the lace fabric in place. In the others, you're relying on the tension of the fabric and the many curves of the pin to hold it in place. They work well, don't get me wrong, but there's just that added bit of security with that second wire.
In other shop news, the row counters are finished! Hopefully, I should have some time tomorrow morning to post the new designs up. I've got lovely shades of red, green, and blue glass beads on ribbons in combinations to suit almost anyone. The beads slide smoothly, but still have enough friction to hold their place while you knit. I indulged myself and made one for myself to test out - to make sure that it works well, of course! I wouldn't want to sell something I didn't test first. Yeah. That's my excuse, and I'm sticking with it.
For other things you can look forward to for the shop, I picked up brass wire! So, look forward to shawl pins in 16 gauge brass wire. I'll more than likely make a few of the current designs and maybe make one or two more new designs. I'm excited!
Each pin works on the same principle:
1) Poke the free end into the fabric.
2) Rotate the pin
3) Poke the free end back out of the fabric
4) Rotate until you have the pin situated the way you want.
It'll take a little bit of practice before you learn how to place the pin just right, but it's worth the effort to have a pin where you don't need to worry about losing different parts.
First off, I have the Swan pin, which has flown to a happy home with Joyarna.
Start with the pin at roughly a 90 degree angle from where you want it to be. So, if you want it to look like this:
Then you should poke the wing tip into the fabric like this:
Once it's in, rotate the pin another 90 degrees, and push as much fabric as you want to hold it into place on the pin. Then poke the wing tip back out of the fabric.
Then it's alot of rotating at this point to get the shawl pin where you want it to be. Here's a step by step progression of 90 degree rotations clockwise to get it where you want it to be. See?
And finally, the swan is where it should be, swimming happily in lace. The swan and the delicately swirling shawl pin have the most amount of twisting around and rotating to get it into place. All the other designs have an easier progression to get the pin in place.
For example, the treble clef works in the same way the leaf would. To get the treble clef into the lace like this:
Start by inserting the curved in at the top of where you'd want the pin to be.
Then rotate the shawl pin and push through as much fabric as much as you want onto the pin.
This next step you can do one of two ways. I took a picture in natural light so you can see the curved end of the shawl pin poking through the fabric better. By tilting the shawl pin a little bit, you poke the curved end right below the top for good alignment.
The other way you could do this last step is simply to push the whole curved bit through, to get to the final step.
And there you have it. I like the treble clef and leaf better than the others, because the curved wire over the pin part of the shawl pin holds the lace fabric in place. In the others, you're relying on the tension of the fabric and the many curves of the pin to hold it in place. They work well, don't get me wrong, but there's just that added bit of security with that second wire.
In other shop news, the row counters are finished! Hopefully, I should have some time tomorrow morning to post the new designs up. I've got lovely shades of red, green, and blue glass beads on ribbons in combinations to suit almost anyone. The beads slide smoothly, but still have enough friction to hold their place while you knit. I indulged myself and made one for myself to test out - to make sure that it works well, of course! I wouldn't want to sell something I didn't test first. Yeah. That's my excuse, and I'm sticking with it.
For other things you can look forward to for the shop, I picked up brass wire! So, look forward to shawl pins in 16 gauge brass wire. I'll more than likely make a few of the current designs and maybe make one or two more new designs. I'm excited!
Saturday, April 18, 2009
Shop Talk ed. 2
So, just a quick update on the shop. I got the feedback from my friends who were testing out the stitch markers. They definitely liked the idea, but the beads were a little tough to move. One of two things has to change, before I go forward with the design. Either the beads need to have a larger hole for the ribbon to pass through. Or, the ribbon needs to be smaller. Since I haven't a clue how to drill out glass beads, it's looking more and more like I must make that trip to the craft store. Perhaps this weekend, if I get a good chunk of stuff done.
For news of the other expansions, I'm working on some shawl pin designs! I had made a shawl pin for myself out of some heavy gauge wire I had from another jewelry project. A friend suggested it would be a great design to add to the etsy shop. (Thanks Joyarna!) I like shawl pins that don't require a stick pin, because, let's be honest, I'd lose the stick pin and resort to using double point needles to hold the shawl pin in place. Then I'd lose the double point needles, and then I'd be in a vicious cycle. As it is, I manage to misplace my DPNs well enough on my own when I'm testing out various projects.
Therefore, I'm working on designs where you don't need a stick pin, in case I hadn't made that point clear enough. So far, I've got three basic shapes and a need for more heavy gauge wire. Yes, it has occurred to me to raid the boyfriend's wire stash. (He's a born tinkerer and an electrical engineer. I do honestly believe he has more miles of wire than I have yarn. He disagrees.) Although, all of his wire is, you know, for circuits, and coated with plastic. I may have to talk this over with him, since I'm still on the learning curve for understanding how wire behaves.
I need wire to practice on. Some of the sketches I came up with, like the darling blue bell design, require sharp, sharp bends in wire that heavy gauge silver and copper don't like to do. Oh, by the way, I'm making them in silver and copper wire! Just in case you didn't catch that. They should be up in the shop this weekend, so keep an eye out for them.
Friday, April 17, 2009
Misadventures in Knitting: Frogging Fun
By fun I mean (insert your favorite expletive here).
This is what has happened to the ocean cardigan after I blocked it and loosely pieced it together to check the fit. Apparently, I could not get away with the extra stitches like I thought I could. If you'll notice, one side is 2 inches longer than the other. No, it's not supposed to be like that. No, I do not like asymmetrical cardigans.
How did this happen, did you ask? Somehow, I added extra yarn overs near the front right button hole strip. I haven't a clue how I added them in. Instead of having three little lacy legs, I had four. And then, I had five. How I added that next one, I don't have any idea. Anyways, I thought I could get away with it. I thought quite wrong. I decreased back down to three lace legs, and thought I was okay to block. All those extra legs translated into two extra inches of length as you can see. I was absolutely stumped as to how I could fix it.
The most reasonable suggestion made was to frog the right front piece, which was much better than my idea to frog the whole thing. I'm still tempted to frog the whole thing and write a new pattern. However, reason ruled and the cardigan is cooling while I ponder what to do next with it. Which brings us to the whole reason for this post.
Frogging.
Every knitter I know lives to avoid this most dire of fates for their finished objects, but sometimes it's just inevitable. If, like me, you can't possibly figure out any other way to save your project, start by picking out your bound off edge. I like to use a thin but not sharp yarn needle to pull the loose end through the loops until I've gotten back to a row where it's purely knit stitches and not bound off stitches. Then I can pull on that sad, kinked end to unravel my stitches until I've reached a desired point - in this case, the other end of the front right bodice.
However, that sounds like a much smoother process than it really is. Some yarns, like cashmere and alpaca develop a halo either as you work with it or after it's been washed and blocked. True to form, the argosy yarn developed a lovely soft halo with form fitting drape. While I want that in the finished garment, it makes frogging difficult because some of that halo wraps around the yarn as you frog it. It forms something like a fabric bead that can almost knot one strand of yarn to another. As you might imagine, this is not a desirable thing for a piece you are frogging. When that happens, the smooth pull of the frogged yarn stops, and you'll probably have a long piece of yarn dangling from a loop with something that looks like a knot.
Stop pulling the yarn at this point, it will just make it worse. Remember that thin but dull yarn needle I used earlier? Bring that back out again, and use it to pull part the "bead" formed by the halo wrapping around the yarn. Sometimes, you can hold both sides of the frogged yarn in the front and back of the bead and pull it apart from the loop. Hold onto the loop while you pull apart the bead of halo, otherwise, you'll continue frogging the yarn below the loop and that makes for a tangled mess. Sometimes you may have to pick apart the fiber bead quite a bit to pull it apart before you can continue frogging.
I've found that the more halo a yarn develops, the more likely it is to form that fiber bead that makes frogging so different. That's why frogging yarns like mohair and angora is so difficult - they have halo in the skein, and the halo just gets fuzzier with knitting, washing, or frogging. These are the least forgiving yarns for mistakes that have to be ripped out. It's a lucky day if you can tink back a few rows in mohair, much less frogging more than that.
Other yarns that I've found difficult to frog include alpaca and cashmere. Both yarns knit up well, but their halo really comes out when you block or wash the knitted fabric. If possible, frogging is best done before you get them wet. Sometimes, that's unavoidable, especially if you're doing lace, where the pattern really doesn't appear until after it's blocked. Lace yarns are delicate to begin with, and frogging them must be done carefully. Sometimes knitting is enough to bring out a halo and that seems to make the yarn a little weaker and more prone to breaking when you pull the yarn out for frogging.
Wool tends to forgive frogging, at least the first time around. Depending on how tightly its spun, wool can be knitted and frogged several times before the fiber beads appear to make frogging difficult. However, single ply wool does NOT frog well at all. Cotton, even thread weight cotton, almost always forgives every frogging attempt. Silk, particularly the smooth silks, present a different sort of challenge. The slipperiness of silk practically allows the stitches to fall out from one row to the next, making it prime knotting territory. Bamboo can be prone to this problem as well, because it makes a notoriously slippery yarn. Acrylic forgives frogging almost as often as cotton does, and that sums up my review of different fibers and how well they frog.
A quick note on how to get rid of the kinkyness of yarn after it's been frogged, wind it up into a skein. Tie lots of figure 8 loops around it to keep the strands from getting tangled. Let the skein soak in a sink or bowl full of cool water, before gently squeezing out the excess water. You can roll it up in a towel and hop up and down on the towel to get rid of the water. Then, hang up the skein on a plastic hanger to dry. You can weight it down with more hangers hanging off the loop to pull the yarn straight if you so desire. Dyers and spinners will be completely familiar with this process. Give the skein at least a day to dry before you wind it up into a ball, and this should take most of the kink out.
In other news, I should have some exciting updates and news about the shop tomorrow. If people want, I can do a frogging tutorial with pictures to illustrate the process of frogging.
Tuesday, April 14, 2009
Blue Blood
Or why you should wet block your lace.
I should have known this from the start, really. The haiku yarn is so saturated with color that I should have known it would bleed blue dye like it was stabbed through the heart and bleeding out the last of its royal blue arterial blood down to the last bleeding blue cell it had to give. You think I'm kidding, but I'm not. It's sitting in my bathroom, bleeding out the last of the dye. (I hope.) The needles on which I knit the sweater are noticeably darker than the rest of the set. I thought it just might be the bamboo wood darkening with use. Oh, no. I took a picture so you could see. Check out the needles, the stain was strong enough my camera could see it.

Once upon a time, those tiny little US 1.5 needles were the same color as the larger size 7's in the picture. The changing colors of my needles should have told me that this was going to bleed. Being a high end yarn, I had the vague notion that the yarn wouldn't bleed, that the dye was well fixed into the fiber. I should have seen from the vibrant, saturated colors of the haiku yarn that it would. Anyways, I'm glad I decided to soak it for wet blocking. It's on bath number 3, and I will take more pictures so you can see just how much dye comes out of this yarn.
Why block?
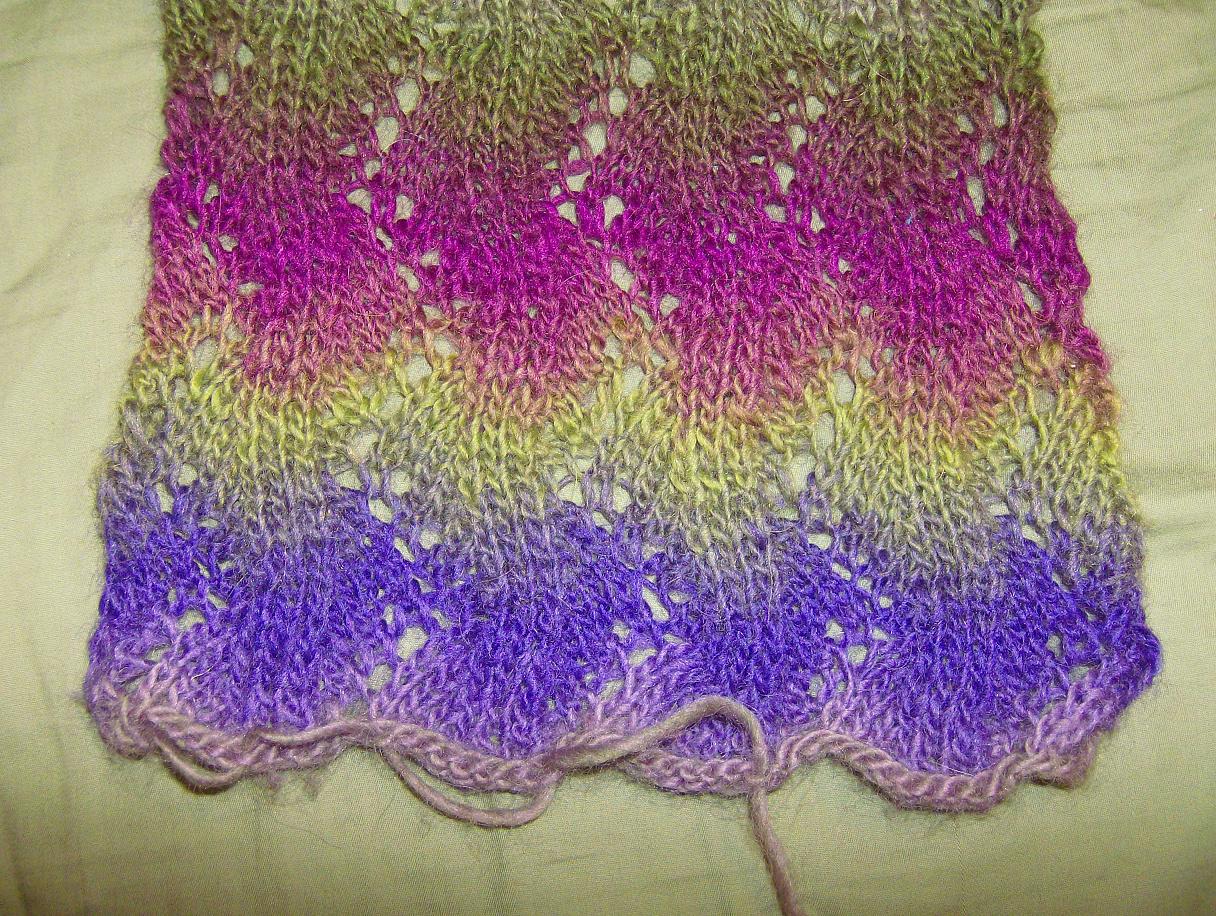
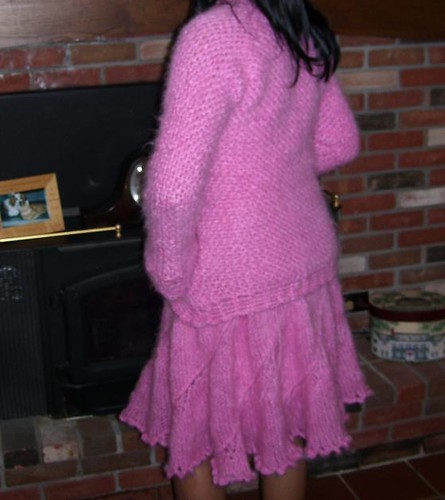
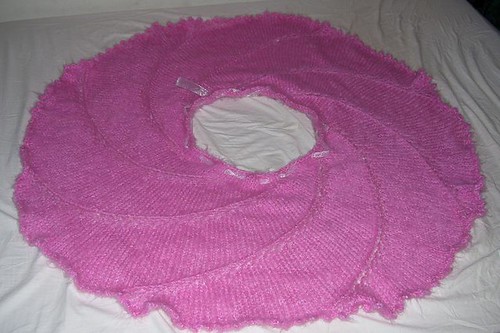
Well, blocking is a process which quite literally transforms lace knitting from something the cat chewed up to a breathtaking heirloom. I don't have any stellar examples of unblocked versus blocked lace, but I do have some photos of before and after for the lace shrug that I made. This is what the lace looked like before I blocked it. It was also maybe 10 inches in width. The final width of that section, before I sewed it together, became 12 inches in blocking. But I get ahead of myself. Here's what happens after you block it. The lace opens up, the garment takes on larger dimensions than the size it was when it came off the needle. The size to which a piece of lace will grow depends on how hard you block it.
How do you block?
There are any number of ways you can block lace. If, like me, you have a love for supersaturated and vibrant colors, then you should let the lace item soak in cool water before you attempt blocking. Trust me. If you attempt to get the lace wet, and then spread it out on a blanket, carpet, or fabric surface, you will have a unique (read - stained) dye job left behind by the lace made from your vibrant yarn. A good rule of thumb is to let it sit in cold water for 15 minutes or more, before rinsing it out. If the water comes out clear after the rinse, then it might be okay to continue on with the process of blocking. If you're not sure, then let it sit for 5 minutes. Toss out the water after that time, and see how clear it comes out. If it's reasonably clear, you probably got most of the excess dye out.
A just-so-you- know moment - this will change the color of your yarn. It won't be quite as vibrant as it was before. However, with the excess dye gone, it will no longer stain your skin smurfette blue, like my sweater would have if I did not let soak away the excess dye. Returning to my out of order process!
Perhaps the easiest way to block is to simply spread out your lace as flat as possible on a large surface. A bed, table, or even the basement floor work well. I've used all three and then some. Ironing boards work well too. Then, with a water bottle or misting spray, spray water until it evenly coats the surface of your project. The surface of the yarn should be damp to the touch, not soaked through. Then, you can gently push and pull at the yarn until it lays almost flat on the surface of the bed or table. Like a fibrous form of clay, you can push and pull the yarn gently into the shape you desire. The weight of the water will sort of weight the yarn down, preventing it from snapping back to the crinkled shape. This is soft blocking, and it's just like what you'd do when you lay a sweater out to dry. You create a shape, but you aren't forcing it into one.
Hard blocking is when you pin that sucker down to dry, and it's not moving from that shape until you pry thosenails pins out from the surface. Beds, foam board, ironing boards, soft, flat surfaces are required for this part. And a plethora of pins! Or, if you wish, you can buy a blocking set which includes rust-proof pins and blocking wires. Other people use string and pull it tight, so it acts just like a blocking wire. The point of all these tools and the pins is to pull the yarn into the desired shape, a triangle, rectangle, circle, a mobius strip - it's really all about the shape you want.
You can start out with a gently dampened lace, or you can soak the sucker, it's all about personal preference at this point. The more wet your project is when you start hard blocking, the longer it will take to dry. If you fear mold or something like that getting into your yarn, run a circulating fan in the same room where the project is drying. Some people fear the project shrinking because of the air circulating around the project, but I have never had that problem. Things dry faster when you have a fan. For me, that's a lesser likelihood of the cats eating my project while it dries.
Anyways, if you've opted to do what I've done so far - aka soak the sucker until there's no more dye to bleed - you have to get it to a not-sopping-wet state for blocking. I prefer to roll my projects in a towel and then stomp all over like I was reinacting the broadway musical. This may not be the preferred method for some. Other people like to put their project in a delicates bag - that zippered mesh thing that I should use more often - and run it through the spin cycle of their empty washing machine. However you get to this point, it doesn't matter. The point is that the project is throughly and evenly dampened. Then you can lay it out on the surface and pin it into the desired shape.
A clever trick for circular shawls is to cut a piece of yarn a few inches or so longer than the desired radius of your shawl. Pin one end of the yarn down in the center of your surface. Use the other end of the yarn to "draw out" a circle - stretch it out, pin the edge of shawl in one place. Move the end of the yarn a few inches along the edge of your circle, pin another point of the circle down there. Rinse, repeat, until you've gone 360 degrees and traced out your shawl's circle with the free end of the yarn. I've never used this trick, as I have yet to make a circular shawl, but I thought it was pretty cool.
As for me, the point of all this rambling was to occupy my time as I waited for my cardigan to bleed out dyes. I want to block it, sew the front and back together, and try it on before I throw sleeves on it. I'm sort of afraid the sleeve caps won't fit, but we'll see. I'll be doing a soft block on this lace, because the pattern was written with positive ease, and I want negative ease. And yet, I didn't decrease the pattern repeats! Go figure!
Yes, this will be a launching point for lace designs in the future. More pictures of the bleeding blue monster to come, once I have wrung out the last of its blue life blood.
I should have known this from the start, really. The haiku yarn is so saturated with color that I should have known it would bleed blue dye like it was stabbed through the heart and bleeding out the last of its royal blue arterial blood down to the last bleeding blue cell it had to give. You think I'm kidding, but I'm not. It's sitting in my bathroom, bleeding out the last of the dye. (I hope.) The needles on which I knit the sweater are noticeably darker than the rest of the set. I thought it just might be the bamboo wood darkening with use. Oh, no. I took a picture so you could see. Check out the needles, the stain was strong enough my camera could see it.
Once upon a time, those tiny little US 1.5 needles were the same color as the larger size 7's in the picture. The changing colors of my needles should have told me that this was going to bleed. Being a high end yarn, I had the vague notion that the yarn wouldn't bleed, that the dye was well fixed into the fiber. I should have seen from the vibrant, saturated colors of the haiku yarn that it would. Anyways, I'm glad I decided to soak it for wet blocking. It's on bath number 3, and I will take more pictures so you can see just how much dye comes out of this yarn.
Why block?
Well, blocking is a process which quite literally transforms lace knitting from something the cat chewed up to a breathtaking heirloom. I don't have any stellar examples of unblocked versus blocked lace, but I do have some photos of before and after for the lace shrug that I made. This is what the lace looked like before I blocked it. It was also maybe 10 inches in width. The final width of that section, before I sewed it together, became 12 inches in blocking. But I get ahead of myself. Here's what happens after you block it. The lace opens up, the garment takes on larger dimensions than the size it was when it came off the needle. The size to which a piece of lace will grow depends on how hard you block it.
How do you block?
There are any number of ways you can block lace. If, like me, you have a love for supersaturated and vibrant colors, then you should let the lace item soak in cool water before you attempt blocking. Trust me. If you attempt to get the lace wet, and then spread it out on a blanket, carpet, or fabric surface, you will have a unique (read - stained) dye job left behind by the lace made from your vibrant yarn. A good rule of thumb is to let it sit in cold water for 15 minutes or more, before rinsing it out. If the water comes out clear after the rinse, then it might be okay to continue on with the process of blocking. If you're not sure, then let it sit for 5 minutes. Toss out the water after that time, and see how clear it comes out. If it's reasonably clear, you probably got most of the excess dye out.
A just-so-you- know moment - this will change the color of your yarn. It won't be quite as vibrant as it was before. However, with the excess dye gone, it will no longer stain your skin smurfette blue, like my sweater would have if I did not let soak away the excess dye. Returning to my out of order process!
Perhaps the easiest way to block is to simply spread out your lace as flat as possible on a large surface. A bed, table, or even the basement floor work well. I've used all three and then some. Ironing boards work well too. Then, with a water bottle or misting spray, spray water until it evenly coats the surface of your project. The surface of the yarn should be damp to the touch, not soaked through. Then, you can gently push and pull at the yarn until it lays almost flat on the surface of the bed or table. Like a fibrous form of clay, you can push and pull the yarn gently into the shape you desire. The weight of the water will sort of weight the yarn down, preventing it from snapping back to the crinkled shape. This is soft blocking, and it's just like what you'd do when you lay a sweater out to dry. You create a shape, but you aren't forcing it into one.
Hard blocking is when you pin that sucker down to dry, and it's not moving from that shape until you pry those
You can start out with a gently dampened lace, or you can soak the sucker, it's all about personal preference at this point. The more wet your project is when you start hard blocking, the longer it will take to dry. If you fear mold or something like that getting into your yarn, run a circulating fan in the same room where the project is drying. Some people fear the project shrinking because of the air circulating around the project, but I have never had that problem. Things dry faster when you have a fan. For me, that's a lesser likelihood of the cats eating my project while it dries.
Anyways, if you've opted to do what I've done so far - aka soak the sucker until there's no more dye to bleed - you have to get it to a not-sopping-wet state for blocking. I prefer to roll my projects in a towel and then stomp all over like I was reinacting the broadway musical. This may not be the preferred method for some. Other people like to put their project in a delicates bag - that zippered mesh thing that I should use more often - and run it through the spin cycle of their empty washing machine. However you get to this point, it doesn't matter. The point is that the project is throughly and evenly dampened. Then you can lay it out on the surface and pin it into the desired shape.
A clever trick for circular shawls is to cut a piece of yarn a few inches or so longer than the desired radius of your shawl. Pin one end of the yarn down in the center of your surface. Use the other end of the yarn to "draw out" a circle - stretch it out, pin the edge of shawl in one place. Move the end of the yarn a few inches along the edge of your circle, pin another point of the circle down there. Rinse, repeat, until you've gone 360 degrees and traced out your shawl's circle with the free end of the yarn. I've never used this trick, as I have yet to make a circular shawl, but I thought it was pretty cool.
As for me, the point of all this rambling was to occupy my time as I waited for my cardigan to bleed out dyes. I want to block it, sew the front and back together, and try it on before I throw sleeves on it. I'm sort of afraid the sleeve caps won't fit, but we'll see. I'll be doing a soft block on this lace, because the pattern was written with positive ease, and I want negative ease. And yet, I didn't decrease the pattern repeats! Go figure!
Yes, this will be a launching point for lace designs in the future. More pictures of the bleeding blue monster to come, once I have wrung out the last of its blue life blood.
Sunday, April 12, 2009
Shop Talk ed.1
I'm so excited! I've finally gotten one of the things together that I had been planning almost from the inception of the shop. I have a video up and running on YouTube of the test we use on the stitch markers. Warning! This video is not for the knitting faint of heart! I abuse my own knitting to prove a point, that the stitch markers have been so well designed that they will not snag your knitting. Polished glass has more of a chance to snag your knitting that our stitch markers, especially if it looks like this.
I'm kidding - but not about the stitch markers, of course! Take a look for yourself. I'm so excited because none of this would have been possible without my snazzy new Eee PC! This sexy little baby will be the cause of my current yarn diet, and I'm okay with that. I was just expecting a fast little laptop where I could crank out excel spreadsheets for my lab class that runs for 8 hours a week. If we're lucky that is. If we're not that lucky, well then, that's just an 8 hour minimum. So I need to utilize any and all downtime that I have to get work done, be it homework, studying, notes, or lab reports. Hence the need for a working lap top to get stuff done. What I wasn't expecting was all the little extras with which it came.
There's the webcam, which you've seen evidence of over at youtube. I'm not entirely sure how I feel about my face being on youtube. I highly doubt I'll turn into a viral video. Then there's also the wonderful mic on the laptop that is ridiculously sensitive. We will not speak of how many test runs I did before the sound quality was to my satisfaction. There's still some static background hissing, but hey, this isn't a profession production studio. There wasn't a teleprompter in my living room giving me cues on what to do next on the video.
I really do hope the store does well, because I'm going to be dependent on its income for yarn money for a while. While the Eee PC is very affordable, it clears out the savings account of a college student working in a lab for minimum wage. Namely, me. So the almost manic devotion to getting the shop up and running and all together has distinct motivations. For example, I would love to knit my my craziest lace designs for the Cherry Tree Hill Competition. Think lace dress, perhaps a gown. Except, you know, I can't afford cherry tree hill yarn right now. What I can afford? Is this yarn from Etsy. In a month, after eating lots of ramen. So yeah, this degree had better be worth it, is all I have to say! So go shop and support your (almost) starving artists.
Saturday, April 11, 2009
Knitting Knews
7/21/2011 - The webservice I use is back up and running! I apologize for the interruption and am happy to say that the free pattern PDF is available for download from this site as well as a free ravelry download.
4/25/2009 - First off, I want to apologize to everyone that has downloaded this pattern already. Two days ago, I found out there was a typo in the x-small version of the swirl skirt pattern. I deeply apologize to anyone and everyone who's tried making the version with 96 sts to cast on and been frustrated with why the lace pattern isn't working out. Rows 6-11 should read as follows:
Row 6: *[YO,K1] 3 times, k2tog, K7* repeat 7 times more. There is a total of 8 repeats of this pattern per round.
Row 7: *K12, K2tog* repeat 8 times.
Row 8: *[YO,K1,] 3 times, k2tog, K8* repeat 8 times.
Row 9: *K13, K2tog* repeat 8 times
Row 10: *[YO, K1] 3 times, k2tog, K9* repeat 8 times.
Row 11: *K14, K2tog* repeat 8 times.
The only thing that's changed is the k2tog in bold print. The reason I left it out is because I am a highly visual and intuitive knitter. When I had written the pattern for the x-small size, I'd made that lace motif 5 times, so I wasn't reading directions anymore, I was visually following the lace as it went. Pure muscle memory doesn't always translate into coherent directions and I'm sorry. Due to computer drama, I can't edit the pdf file of the x-small version right now. However, I have an mht file that I've uploaded to the same directory. You can save the corrected version of the x-small size, and both internet explorer and microsoft word will let you read the complete pattern and print it out if you desire. As soon as I am able, I will upload a PDF. (Lots of computer drama, my Heroes ability is the opposite of Micah. Apparently, I am a walking, talking EMP blast. Computers sense this and crash at random when I touch them. I fry power supplies by touching just one innocent button.)
In knitting news today, I'm over half way on Panel 2 of the front! I'm still no where near my dear friend, Mitz, is on her dress, but I'm enjoying it. I'm reaching the end of the panel and I can feel the drive to finish this section of the dress creeping into my blood. The relentless beat is in my pulse, and my fingers want to march in time with a finished object. It wants to be done, so I can try something new!
In other news, I finally swatched the etsy yarn - oh the suri halo! I have a feeling that when it's worked up, it will feel like the softest mohair ever. I love how alpaca blooms with just the slightest abuse when soaking it. Just a little swishing around in a sink full of water brings out the halo. It won't felt it, and it will create such a soft and warm fabric that's also incredibly light. Deliciousness!
I was a little disappointed in the lace pattern that I used; though, it was the ubiquitous lace clover pattern. The yarnovers in my swatch weren't even at all, and my gauge changed in 10 rows. I'm so tempted to try my hand at my own pattern, but with the yarn doubled, I'll only have about 600 yards or so to play with. I have a few patterns in mind to use as a launching point, but they can wait until I'm done with the ocean waves cardigan. I think part of the reason the tiny swatch drove me crazy was because I was already working on something in a fine gauge. One set of tiny needles at a time, please!
Although, I do have a little freebie for people that aren't on ravelry already. A while ago, I created a skirt pattern that I put up for free, but it was really only accessible through ravelry. I'll put it up here for people to enjoy and modify to suit their personal uses. (Read- not for commercial sale or use.) The Swirl Skirt pattern uses about 500 yards of bulky weight yarn on size US 10.5 needles. The first link is to a pdf file, for the size "x-small". This is the size "small" on me.

I have that in quotes because it's still very large on me, on the order of 4 or more inches of unstretched ease. The diameter of the waistline circle is 18 inches. This is the original one I made that has 112 stitches to cast on for the waistline.
The lace pattern is easy - it's built around a multiple of 8. So long as you reduce the number of stitches by a number divisible by 8, the lace pattern will continue to work. It can also be increased by a multipe of 8. So you could cast on 112 stitches for a larger size, or 84 for a smaller size. If you do want a larger size, I have instructions for the 112 sts cast on. Enjoy! I can't wait to see what other people come up the pattern if they do use it.
Other news updates - just finished a batch of markers, so those should go up in the shop within the next few days. I sent two of the row counters out with some friends for them to test out the design. It's going to need a little tweaking before it's ready to go up in the shop. I need to find a good, strong ribbon or string to use, which may necessitate a trip to the craft store. I'll keep everyone informed.
4/25/2009 - First off, I want to apologize to everyone that has downloaded this pattern already. Two days ago, I found out there was a typo in the x-small version of the swirl skirt pattern. I deeply apologize to anyone and everyone who's tried making the version with 96 sts to cast on and been frustrated with why the lace pattern isn't working out. Rows 6-11 should read as follows:
Row 6: *[YO,K1] 3 times, k2tog, K7* repeat 7 times more. There is a total of 8 repeats of this pattern per round.
Row 7: *K12, K2tog* repeat 8 times.
Row 8: *[YO,K1,] 3 times, k2tog, K8* repeat 8 times.
Row 9: *K13, K2tog* repeat 8 times
Row 10: *[YO, K1] 3 times, k2tog, K9* repeat 8 times.
Row 11: *K14, K2tog* repeat 8 times.
The only thing that's changed is the k2tog in bold print. The reason I left it out is because I am a highly visual and intuitive knitter. When I had written the pattern for the x-small size, I'd made that lace motif 5 times, so I wasn't reading directions anymore, I was visually following the lace as it went. Pure muscle memory doesn't always translate into coherent directions and I'm sorry. Due to computer drama, I can't edit the pdf file of the x-small version right now. However, I have an mht file that I've uploaded to the same directory. You can save the corrected version of the x-small size, and both internet explorer and microsoft word will let you read the complete pattern and print it out if you desire. As soon as I am able, I will upload a PDF. (Lots of computer drama, my Heroes ability is the opposite of Micah. Apparently, I am a walking, talking EMP blast. Computers sense this and crash at random when I touch them. I fry power supplies by touching just one innocent button.)
In knitting news today, I'm over half way on Panel 2 of the front! I'm still no where near my dear friend, Mitz, is on her dress, but I'm enjoying it. I'm reaching the end of the panel and I can feel the drive to finish this section of the dress creeping into my blood. The relentless beat is in my pulse, and my fingers want to march in time with a finished object. It wants to be done, so I can try something new!
In other news, I finally swatched the etsy yarn - oh the suri halo! I have a feeling that when it's worked up, it will feel like the softest mohair ever. I love how alpaca blooms with just the slightest abuse when soaking it. Just a little swishing around in a sink full of water brings out the halo. It won't felt it, and it will create such a soft and warm fabric that's also incredibly light. Deliciousness!
I was a little disappointed in the lace pattern that I used; though, it was the ubiquitous lace clover pattern. The yarnovers in my swatch weren't even at all, and my gauge changed in 10 rows. I'm so tempted to try my hand at my own pattern, but with the yarn doubled, I'll only have about 600 yards or so to play with. I have a few patterns in mind to use as a launching point, but they can wait until I'm done with the ocean waves cardigan. I think part of the reason the tiny swatch drove me crazy was because I was already working on something in a fine gauge. One set of tiny needles at a time, please!
Although, I do have a little freebie for people that aren't on ravelry already. A while ago, I created a skirt pattern that I put up for free, but it was really only accessible through ravelry. I'll put it up here for people to enjoy and modify to suit their personal uses. (Read- not for commercial sale or use.) The Swirl Skirt pattern uses about 500 yards of bulky weight yarn on size US 10.5 needles. The first link is to a pdf file, for the size "x-small". This is the size "small" on me.
I have that in quotes because it's still very large on me, on the order of 4 or more inches of unstretched ease. The diameter of the waistline circle is 18 inches. This is the original one I made that has 112 stitches to cast on for the waistline.
The lace pattern is easy - it's built around a multiple of 8. So long as you reduce the number of stitches by a number divisible by 8, the lace pattern will continue to work. It can also be increased by a multipe of 8. So you could cast on 112 stitches for a larger size, or 84 for a smaller size. If you do want a larger size, I have instructions for the 112 sts cast on. Enjoy! I can't wait to see what other people come up the pattern if they do use it.
Other news updates - just finished a batch of markers, so those should go up in the shop within the next few days. I sent two of the row counters out with some friends for them to test out the design. It's going to need a little tweaking before it's ready to go up in the shop. I need to find a good, strong ribbon or string to use, which may necessitate a trip to the craft store. I'll keep everyone informed.
Tuesday, April 7, 2009
Let's make stone soup!
Here's hoping. I took the stone soup challenge, and pledged 20% of the shop's earnings to spend back on Esty. Am I excited? You bet! Except - to mangle a Jayne quote - "Let's see, 20% of nothing is still... oh wait a minute.. nothing!" To which Mal more or less tells Jayne to shut up.
I can't decide if I'd pull an Inara-esque retort or not. I probably would.
Returning back from that brief sojourn into the Firefly-verse, I am psyched about the etsy shop and stone soup pledge. I've started digging around Esty and finding favs, like this delicious silk and cashmere blend yarn. It's cobweb weight of course. Did we forget I'm crazy, and love yarns that torture me? I suppose I'm a knitting masochist, I love the beauty of fine yarns that I forget all about the pain, eyestrain, and needle stabs that knitting in tiny, tiny gauges causes.
Like the last yarn I just bought from Etsy - my first purchase to be exact, was the dreamy rose yarn. I could hardly wait to swatch with it, to tell you the truth. And then I discovered how thin the yarn really is. Thankfully, all the abuse of swatching and frogging brought out the Suri halo beautifully, and the yarn is even mroe soft and squishy and delicious. But I'm going to knit with it doubled, just because I don't want to go blind squinting at 000 needles that would be needed to knit a strand of this yarn.
Silence you. Knitting a cardigan at US 1.5 needles is way better!
Yeah, I know, nobody believes me. But the cashmere content makes knitting such a luxurious experience. The feel of the silk and cashmere sliding through your fingers as the needles seemingly weave this delicate fabric out of gossamer yarn. The soft drape of the lace as it falls down your fingers to form your garment, just giving a teasing hint of how sensuous it will feel against your bare skin when it's finished. Oh, the raptures of luxury yarn!
I can't decide if I want to knit the dreamy rose yarn in an established pattern or write one of my own. I have a lace pattern floating around my head, that got inspired by the vogue dress. I am going to limit myself, however, to two intricate lace projects at one time. Even I have limits on the insanity that I'm willing to attempt. Thankfully, the stone soup challenge is about shopping responsibly, and we all know I need help in that department!
Sunday, April 5, 2009
Oh commercialism tastes so good...
Actually, my brain is a little fried right now. I've been up since 5:30 am or so, and I've only had 1 nap today.
On the happy upside, I've gotten ALOT done, including getting the shop up and running to my satisfaction. For those that care, it's at:
http://REminders.etsy.com
So far, all we're selling is stitch markers. Why? Here's the story. I bought some pretty stitch markers once, at an out-of-town LYS. Unfortunately, the best thing I could say about these markers is that they were pretty. They ate my yarn worse than a cat on crack. You could probably hear my cursing half way across the globe, as the markers snagged yet another strand. The not-so-great craftsmanship of the markers is what inspired me and the wonderful boyfriend to make an etsy shop with markers that don't eat yarn. I've tested all our stitch markers on my own lace knitting, just to show you how much faith I have in them.
There's so much more I meant to do with the shop, but I'm tired, and at the point where I forget things I should know. Like the teardrop faceted cut is called briolette. I had to look that up, which was a sad moment for me.
I do want to make a youtube video of the testing of the stitch markers, so that the faint of heart can see just how much you can abuse both yarn and marker without snagging. It was funny to see a friend's face the first time I showed her how vigorously I would rub the markers with lace. She delicately dragged the markers across one of my shawls. Me? I rubbed that sucker in there, pinched the marker between two fingers and rubbed like I was trying to polish the glass. No snags, but perhaps a heart palpitation or two on her part as she watched.
And I'll have to figure out those widget thingies. And possibly pimp out my shop in other ways. Joy's done such a great job with her shop, mine's been kicking around for how many months now? It's about time I got it into gear.
Subscribe to:
Posts (Atom)